
Task A
Task A explores a basic of digital modelling mainly focusing on the additive and subtractive process, also includes the potential of its functionality in terms of the permeability, porosity and lighting effects.
Iteration Considerations
Subtractive & Addictive Process
Key Iterations

Sphere Mirror and Scale

Mirror and Pipe
Position Test and Combination


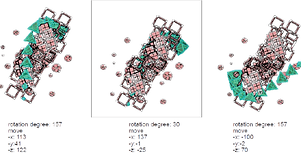
When creating my matrix, I planted the boxes in Rhino and put my models into their position, used the text function in Rhino as well for recording. Then I moved to top view and used the make 2D function to flatten the information and export to Adobe Illustrator to make some adjustments and alignment. For some grid especially, when very few features can be observed through top view, perspective views are also appended in order for more clear presentation. Also when making alignments for my scripts, I divided the parts into different groups with titles based on function and geometry data type, which makes it easier to identify when thinking of making changes and more clear in terms of presentation.
The three captures shown above are three parts of my matrix which show different phases of my main iteration. The inner structure is shown by using dashed lines. In fig.12, groups of scaled and mirrored geometries can be observed, together with the geometry test for boxes and spheres, which are the two key geometries in my layer 1 and 2. In fig.13, the iteration based on point attractors and selected index of basic geometry is shown, there are two further mirroring process with detailed input changes and a pipe command, which forms the overall structure for layer1. The matrix for final possible position test and combination is shown in fig.14, which is at the very end of my matrix, indicating how the three layers started from pieces and came together in the end, but in more complex structure and with more possibilities for space exploration.
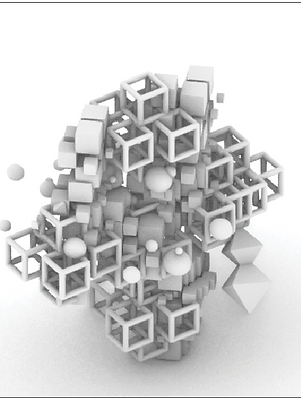
I noticed that one thing that is spectacular thing about digital fabrication is that it enables a large amount of calculations, capabilities to build more complex structures as well as more possibilities of how the geometries can com together to become something more than expected. In my model exploration, I aimed to contain various geometry shapes, with control of their scale and position, and combine them in different ways to observe the possibilities of space utilization, which leads to my final piece, and this can be best represented by these three parts of my matrix.
Grasshopper Script Development Considerations


Development Matrix
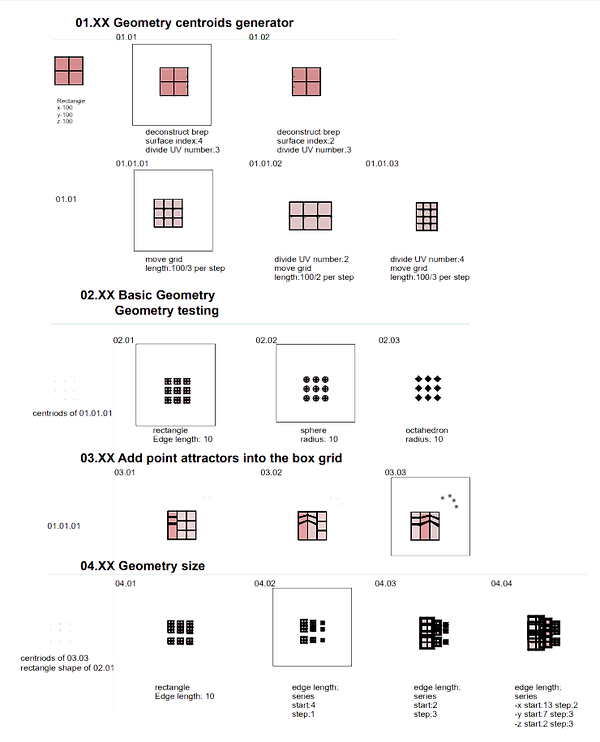
Starting from having a group of boxes, followed by test and explorations of the point attractors and geometry shapes, I formed a ‘stage1 test model’.
After that, I developed my final piece by starting from the boxes, the key algorithm used for this one is the mirroring function, which allows me to make iterations of my geometries according to different index, planes and also according to point attractors. I developed the boxes mainly into three parts, which then did separate iterations and then come back all after to make final adjustments.
In the third layer of the piece, which is mainly about curve oriented objects, I consider the most functional and important part is the use of point attractors together with distance dispatch, which makes it possible to have desired geometries in the right positions, at the same time it is very controlled. The innovation of more parameters and more varied commands and geometries are also very useful.
I noticed that as the number of geometry increases, the more interesting phenomenon is likely to be observed, also with the use of point attractor can make a huge difference in order to gain more possible combinations. Therefore, I reckon the very successful iterations are defined as the variable combination of in-controlled geometries.


3D Printing Preview

The main constraint is its feasibility, when constructing and selecting the models, whether the model is is reasonable for constructed needs to be taken into consideration. Firstly, thickness analysis needs to be done to make sure that the models especially the edges or transitions between different thresholds are thick enough so that the printed model would not fall apart. Besides, we need to make sure that the mesh does not have any naked edges and openings, which will make it impossible to be printed out.
Subtractive & Addictive Outcome
For my first isometric, I choose it because of its good quality of the combination of different shapes of geometries, as well as how it organizes the surrounding space, which makes it available for people in different age groups(different heights of platform and openings) to come from all directions to interact with, and do various activities based on the structure. Therefore, I chose the edging parts of the pieces to do experiences and then to cut the final 50*50*50 cube, in order that it has a good combination of different shape at the same time there are enough space in between for interactions.
One interesting part of this model is that due to its openings at the back, for one thing it defines the space to be more private not only for people at the back, but also in the front who wants to lean on the back, and the triangular shaped back shapes their movement area, and for another, in different times of a day, the effect of shadow varies, which makes it more attractive not only as a multi-functional bunch.


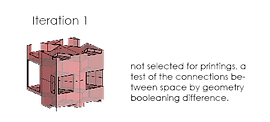
For this model particularly, I choose to use the ‘BooleanDifference’ command to get the 50*50*50 cube form in order to obtain a model with more complex space structure for the inside part, I decide to choose the part where the boxes gather closely of my model to do the command so that I can get a comparatively mode neat and unified outcome, I also did a bit rotation so that the final model can have some subtle edges or openings.
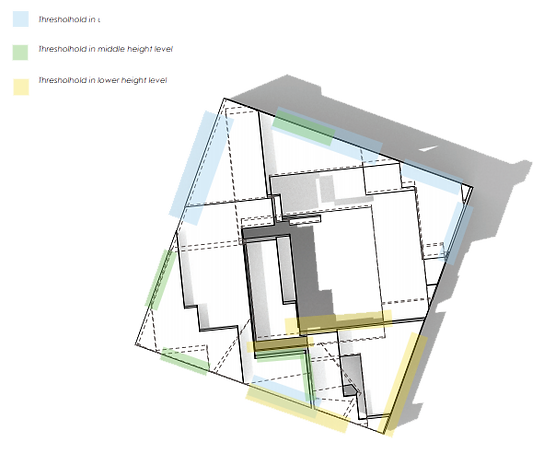
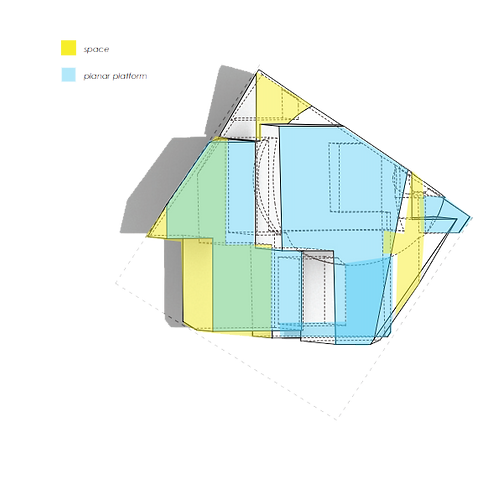
One quality of my second model that I am satisfied with is that it forms threshold from mainly three different height levels, which enables it to be constructed at somewhere there is a high demand of flowrate and to connect population in different height levels together by having this structure, accompanied with a well distributed division of public and private area and inviting view points.

For the third model, one point that it attracts my attention is that there are two sides of almost completely different structures in this model, and therefore it would lead to different space interpretations and possibly two different kinds of activities taken place. For another, the parts of this model are very neat and clear, which is in good condition for 3D printing. Besides, it has a good combination of three three types of geometries: boxes, spheres and pipes, which leads to its unique appearance.
Therefore I decide to choose it as my third 3D print model, when thinking of the possible interpretations, the very exciting part is that it can be think of a good combination of human activities taken place as well as on some of the platforms, decorations can be put on, which harmonize the activities taken place here, which is also a good representation of how the structure defines space and can be used for different purpose.


The scale for the first one was selected in order to maximize the use of the space, especially for the thick, box shaped geometry and the thin, pipe-like shapes. The aim is to find the best balance, and think of what kind of activities are likely to take place.
The second model is interpreted as a huge pavilion of connection of people come from upper, middle and lower height levels. It forms a comparatively open area at the same time there are still some half open spaces and inviting views thresholds.
This third model has very different visions on both sides, for the reason that the model was formed in quite an angle when selected, so that it enables people of different age groups to have different interactions according to their body size and the given space distance, it can also be used as a combination of decorations and human activities taken place for in-between spaces.